
Beaded Button – Beadwork Project
You can quickly create spectacular buttons to enhance store bought or hand-made clothing and accessories with this technique.
 Supplies
- * Fabric Covered button kit
- * Beads
- * 3 x 3 swatch of coordinating fabric
- * Sewing Needle Sharps or English Bead Needle
- * Chalk
- * Thread
A word about supplies
Fabric covered button kits have long been available for use in garments. This project takes an ordinary product and creates a unique piece of wearable art. You can find these kits in any sewing or craft shop. Finished button sizes vary from ½ to about 2. Maxant and Dritz are two manufacturers that offer these kits.
To complete this project with ease, youll need a special needle just for use with beads. Beads are sized according to the center opening. In order to get a needle through the bead, the bead size must be larger that the needle size. Typically the beads youll use for this project will be between size #6 and #12. Youll need a very tiny needle, called a Sharps or English Bead Needle to be able to pass thread through you beads. If your sewing supply shop doesnt carry such small needles, look for them in a beading shop.
Selecting your beads
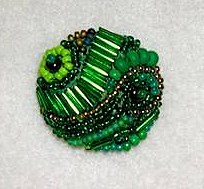
The unique design of the button sample was achieved using a variety of beads in different sizes and shades. If you want to create many beads, buy your beads in bulk by single colors. Most bead shops carry packages of mixed bead. One great product for this project offers a small amount of many different and very beautiful beads is called Bead Gravy by Hoffman Originals ($4.25).
How to Create Your Own Beaded Button
Make sure to read the instructions on the button kit you chose. The kit will come with a pattern for the fabric size needed to cover the button. The fabric needed to cover the button will be larger that the top surface of the button. You will bead only on the top surface area.
1. Cut out the pattern and trace it onto your 3 square – Dont trim yet
2. Stretch the fabric over the button to see the area youll bead.
3. Mark the fabric around the rim of the button with chalk to designate the beading area.
4. Starting in the center of the fabric, sew the beads on in a pleasing pattern.
5. Knot your thread and bring the needle up from the wrong side.
6. Thread a couple of beads onto the needle at a time.
7. Arrange the beads and bring the thread through to the reverse
8. To secure the beads, bring the thread through to the front and tack down the thread that runs between each bead.
9. Another technique is to attaché each bead individually by bringing the thread up in the location you want your bead, bringing the thread through the bead and back through the fabric to the reverse.
10. You design may call for using a combination of these techniques.
11. Continue to add beads until the area you marked is full of beads and you like the way it looks.
12. Tie off the thread securely by weaving it through the threads on the reverse side and knot securely.
13. Complete the button by following the manufacturers directions for covering the button.
14. Patience is required; the beads make this button bulky and difficult to set into the button finishing mechanism.
You’re done! Enjoy your button in as many creative ways as you can think of.
Use your button creation to add excitement to almost any garment or fashion accessory you can think of. For example: * As a brooch on a jacket or blouse * As a choker on a satin ribbon or cord * On a hair elastic or clip * Fasten to an evening clutch * Use it to fasten a scarf
This article first appeared in the I Love to Craft PDF Magazine Spring/Summer 2006 issue, a free-to-download Online Crafts Magazine.