
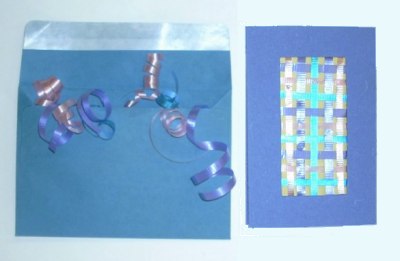
Woven Ribbon Framed Card – Handmade Card Making Project
Creating your own card is an easy and fun activity for anytime of year. This colorful card looks rather fancy with a cutout frame and woven-ribbon art. But the idea works for any picture or drawing you want to use. Best of all its quick and simple to make, and easy to personalize.
Card Materials: Pretty paper – 6 inches wide and 12 inches long Scissors Glue RulerInsert Materials: Pretty paper- about 5 inches wide and 3 inches long Cheap gift-wrapping ribbon, assorted colors – anywhere from 1/3 to ¾ inch wide and as long as needed Scissors Glue
Instructions:
1. To create your card, just take the large piece of pretty paper and fold it into three equal sections lengthwise. This should create three sections, each 6 inches wide and 4 inches long. The thicker the paper, the better. 2. In the middle section, measure with a ruler and cut out a rectangle, leaving at least a ½-inch strip around each side to act as a frame. 3. Paste a picture or drawing in the middle section, so that the card frames the art. Fold one of the section ends over the back of the picture and glue. Now you have a basic folding card, with a picture on the front, and you can open it to a clean paper for writing on each side.
4. To create my fun woven ribbon insert for this basic card, use the smaller pretty paper in a contrasting color to the card. Simply measure the length of ribbon needed, and glue 4-8 strips, evenly spaced, down the back bottom edge and left side of the insert. Let dry. Now you have ribbons attached to the card that you can weave together. 5. Fold the ribbons over the edge and onto the front of the insert. Weave ribbons together, and pull tight at the end. Fold ribbon ends over card back again and glue in place. So ribbons attached at the bottom of the insert back should end at the top of the insert back. Ribbons attached on the left side should end on the right side. 6. Slip insert into back of card frame and glue in place, then fold card as directed. Write your message in the card. 7. Cut a few extra strands of ribbon and curl them into little ringlets. Place the ribbons in an envelope, insert card and close envelope, then its all ready to give!
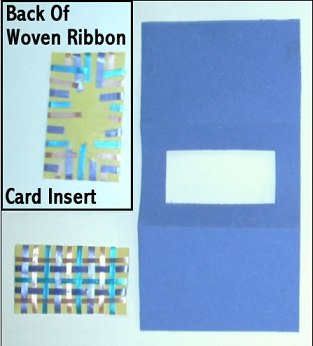
Notes: You tape or glue the ribbons to the backside of the insert to give a cleaner, tighter, and more secure weave pattern. You tape or glue the insert to the card to make sure it stays in place, regardless if its mailed or hand-delivered. However, if youre sending a beautiful photograph that the recipient may want to get professionally framed, just tape the picture to the card so its easy to remove. When you do the ribbon weaving on the card insert, remember that you can do an open weave, where the ribbon strands are placed far apart, or you can do a closed weave, where the ribbon strands are place right next to each other. An open weave will show the insert paper, and a closed weave will show just the ribbon.
by Aysha Schurman