
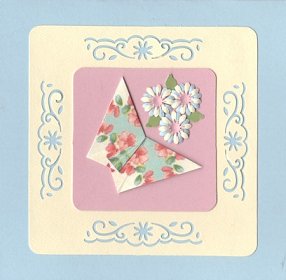
Teabag Folding Butterfly Card
 You will need:
- Uchida CP-48 Daisy Punch (approx 5/8)
- McGill Miniature sun punch (approx ¼)
- ProvoCraft Paper-Shapers leaf punch
- Fiskars Border Punch
- Glue
- Paper Cutter (optional)
- Embossing tool (optional)
- Small piece of fun foam for embossing (optional)
- Folding instructions for teabag tile butterfly
- Two Teabag Tiles – Scroll down for free printable tiles
- 5 x 10 colored cardstock for card blank.
- 4 x 4 White or off-white paper or cardstock
- 2 ½ x 2 ½ colored cardstock in a color that coordinates with the 5 x 10 card blank.
- Medium to heavy-weight paper scraps for flowers in three colors, two for the petals and one for the centers.
Recommended Books:
|
Instructions:
1. Fold the teabag tile according to butterfly folding instructions and make one butterfly.
2. Punch three daisies from each of the two colors you chose for the flower petals.
3. Punch three miniature suns from the color you chose for the flower centers.
4. If you have an embossing tool, place the daisy pieces face down on the fun foam and carefully emboss the back of each petal so that it curls up. After embossing petals, turn the daisy over and emboss the center so that it indents. Emboss the miniature suns until they are bowl shaped.
5. Take one daisy of each color. Glue one daisy on top of the other so that the petals of the bottom daisy line up with the spaces of the top daisy.
6. Glue a miniature sun to the center of the flower you created in step 5.
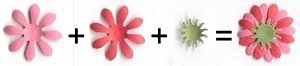
7. Repeat steps 5 and 6 for the remaining two flowers
8. Score and fold the 5 x 10 cardstock to form the card blank.
9. Using your border punch, center and punch a design on all four sides of the 4 x 4 square.
10. Center and glue the 4 x 4 square to the front of the card blank
11. Center and glue the 2 ½ x 2 ½ square on top of the 4 x 4 square
12. Arrange the butterfly, flower and leaves in the center of the 2 ½ x 2 ½ square.
13. Send your card to someone and brighten their day!
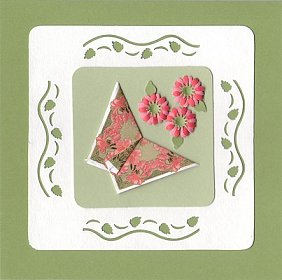
Other Variations of this same card using different colors:
Free Printable Teabag Folding Tiles
Note: Click on thumbnails to enlarge. Then right-click, choose save as and save the image on your computer. When saved, right-click and choose ‘print’ or print through graphic software of your choice.
 |
 |
 |
 |
 |
Project by DCW Member Judy Headrick of Cards & Crafts.