
DIY Rainbow Tie Dye Pillowcase
Add a bright bolt of rainbow colored sunburst to your room with this vibrant rainbow tie dye pillowcase.
Materials Needed:
- Tulip One-Step Large Tie Dye Kit, Rainbow
- White cotton jersey pillowcase. (Kit will dye 2-4 pillowcases.)
- Plastic to cover your work surface
- Plastic apron (or make a cover-up from a trash bag)
- 5 gallon bucket
- Plastic wrap or plastic grocery bags
- Paper towels
- Small plastic bowl
- Measuring cup

Instructions:
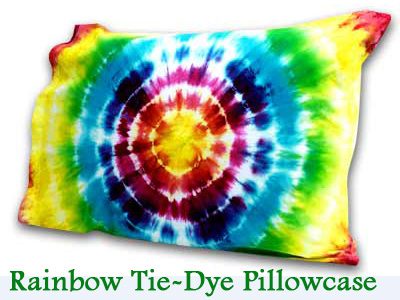
For best results, please read all instructions before beginning project. Refer to photo for color and design placement.
1. Dissolve packet of soda ash fixer in one gallon of water. Stir well to mix (wear gloves).
2. Add warm water to the bottles of dye, replace tops and shake gently to mix.
3. Wet the pillowcase in plain water, then fold and bind in a sunburst design: Lay pillowcase flat and determine design center. Pinch this up and bind it about 1-2 inches from the top with a rubber band. Continue binding it at intervals of 2-3 inches. Put the bands on tightly to get a good sharp effect.
4. Put bound pillowcase in fixer to soak 20-30 minutes. (Don’t discard fixer. It can be saved and reused.)
5. If you are doing 4 pillowcases, add water to dilute the dye so that you have two bottles worth of each color (pour the bottle of dye in a jar, add another bottle of water). Clip a bit of the tops off of each bottle so the dye will flow easily.
6. Make a dying pad of folded paper towels.
7. Take first bound pillowcase out of fixer, place on dying pad and apply dye. Apply yellow to the first two (smallest) sections of the pillowcase. Apply fuchsia dye to the second, third and fourth sections. Apply turquoise dye to the fourth, fifth and sixth sections. Continue in this manner until the whole pillowcase is dyed. Be sure to get dye down in the folds, especially in the thickest sections and turn over to do other side. Have a small bowl of water near your project to rinse off your gloved fingers as you work.
8. Cover the dyed project with plastic wrap and let set 8-24 hours. Longer setting time yields more intense color.
9. Rinse in several changes of water and wash on hot with any regular detergent.