
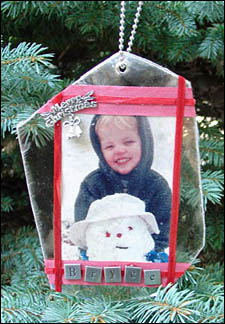
Photo Ornaments: Christmas Craft
This technique is easy, quick and a very nice gift or gift tag for pretty holiday packages. Because the mica is clear, lights will glisten through the edges, lighting up the photograph. These ornaments would be particularly nice for a family photograph, or individual photos of each family member.
Materials:
- Mica Tile
- Perfect Paper Adhesive – Gloss
- Ribbon
- Metal Letters- Making Memories
- Charm – Marian & Me
- Eyelet, Eyelet Setter and Hammer
- Ball Chain or Christmas Hook
- Photograph
Directions:
- Select a Mica Tile that is a tad larger than the photograph. Delaminate the Tile so there are two pieces. Note: On the back of the photograph a Merry Christmas including the year, can be written, the details of the photograph, a childs drawing or old Christmas card. Do this because the backside will show as the ornament turns.
- Adhere the photograph to Mica Tile using Perfect Paper Adhesive gloss. Note: Using gloss adhesive will keep the mica clear and shiny.
- While the adhesive is still wet sandwich the tiles back together. Or apply a bit more adhesive to the backside, and then reattach the two pieces.
- Adhere ribbon, charms and letters around the Mica Tile for further decorating of the ornament.
- Set an eyelet at the top of the Mica Tile. Hang a hook, ball chain or string through the eyelet so it is ready to hang on the tree or in a window.
All products italicized are available from www.usartquest.com