
How To Make Paper Beads
Instructions:
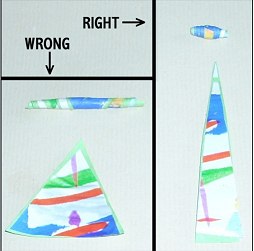
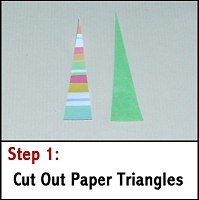 1. Cut out a small triangle from pretty paper. The width of your triangle determines how long the bead will be. The length of your triangle determines how wide and what shape the bead will be. In the Wrong/Right picture, you see that a very thick and short triangle makes a shapeless and ugly bead. A very skinny and long triangle makes a small and very round bead. In the Step 1 picture, you can see that I used two pieces of paper for each bead. The first is some thin, leftover wrapping paper. The second is some plain green construction paper. If youre using more than one piece of paper, the pieces can be the exact same size, or one slightly skinnier than the other. Just have fun with different techniques to make different looking beads. .
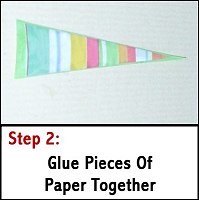 2. Glue pieces of paper together. If youre only using a single piece of paper, then obviously you can skip this step. But if youre using two or more pieces of paper, you need to glue them together so they dont slip around during the rolling process. As you can see in the Step 2 picture to your right, you need to be careful when sticking the papers together. You need to make sure that the papers stay smooth and even. Any wrinkles, sloppy pasting, or wildly mismatched triangles will make a very ugly bead. Let the glue dry a little before starting to roll your bead.
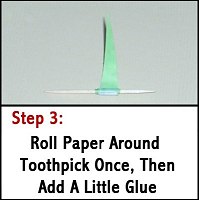 3. Start rolling your bead. To begin rolling your bead, take your toothpick, or other hole-preserving item, in hand. Start at the bottom of the triangle and carefully roll the very edge of the paper around the toothpick. Make sure to roll the paper tightly around one or two times, and then stop. Apply some glue the remaining inside of the paper. Then continue rolling the bead tightly around the toothpick, making sure to roll to the tip. Try to keep the top of the triangle in the center of the bead. Having it shoot to one-side will make a lop-sided bead.
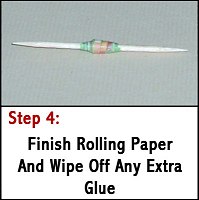
 4. Finish your bead. Keep rolling your fingers around the bead a few times before stopping. This helps smooth out any bumps and curl the paper. Using clean fingers, or a lint-free towel, wipe any extra glue off the bead, making sure not to unroll the bead in the process. Slip the bead carefully off the toothpick, then set on a piece of plastic wrap, or just on a plastic baggy. Let the bead dry. Once completely dry, cover the bead with a seal. Just paint a thin, even coat of glue over the bead and let it dry again. Apply two coats if needed, just always make sure to let the glue dry completely in-between. Also be careful not to paint over the bead holes, or itll be impossible to thread. The easiest way to do this is to just slip the bead back onto the toothpick, seal, then slip back off and let dry.
 5. Have fun. Now let your beads dry and string them into a bracelet or necklace. You can also use them for general decorations or sewn onto homemade cards. Experiment with different sizes of triangles, different types of paper, and different styles of layering. Theres a huge variety of beads that can be created by just changing one or two small things, such as using matte or glossy paper. Notes:
You can also paint your own designs onto paper, then cut and roll the paper into beads. This is a great activity for younger children, since it has a few steps that only take a small amount of time each. The steps can be broken up over a few days, then a few more days can be spent making crafts from the paper beads. This means an entire week might be spent focusing on one craft, which is perfect for schools, daycares, or just plain, old, bored kids.
by Aysha Schurman