Handmade 3D Card – Fancy Butterflies
These dimensional butterflies shimmer and shine, just like the real thing. Nothing evokes thoughts of spring and summer better than butterflies. Our handmade 3D card tutorial featuring these delightful shimmering species will bring summer cheer to anyone receiving them. They are simple to make using acetate sheets but they make your hand crafted cards stand out, in more ways than one.
You will need:
Stamps: Stamps Happen Butterflies(90247), Butterflies script (90296)
Pens, Marvey le Plume, blue, red, brilliant yellow, yellow
Blender pen
Embossing pad
Detail gold powder
Midnight crafters ink
Embossing powder, turquoise sparkle
Pigment ink, black, dark blue
Glitter glue (Ice Stickles used here), Bluberry ice
Card, A4 sheet pale blue; A5, white, bright blue, gold, pale blue
Acetate sheet
Double-sided tape
Craft knife
Ruler
Cutting mat
Scissors
Tweezers
Heat gun

 by Stamps Happen
Handmade 3D Card Tutorial:
1. Fold the A4 sheet of pale blue card in half and set aside. Onto white card, gold emboss the butterflies (90247). Color in using the pens and the blender to add variation to the shading. Add glitter glue to small portions of the wings. Trim this panel to 19cm x 12.5cm (7 1/2″ x 5″), layer to the gold and the bright blue, each time leaving a small border. Layer to the folded card.
2. Use midnight crafters ink and the turquoise sparkle powder with the butterflies, to stamp on the acetate. Heat set, be careful not to warm too much or the acetate will buckle, if the tool is held slightly higher than usual it should be fine. Cut out the butterfly shapes.
3. Nip the body of the acetate image with tweezers; holding it upside down, warm up the back of the butterfly with the heat gun. As it warms the wings will droop, when you turn it back over they appear bent upwards. Do this with the remaining butterflies. Use a little double-sided tape on the body section only of the acetate creatures and stick them over the colored images (you can use other glues if preferred, but you should allow drying time.).
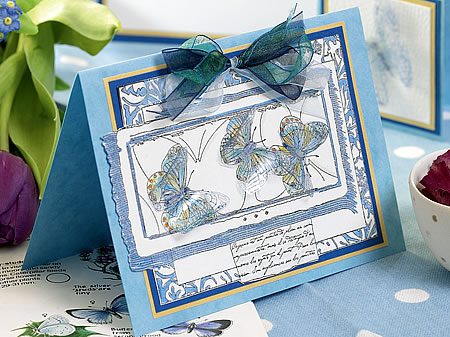
Butterfly Collage How to:
Fold pale blue A5 card in half and set aside. Emboss the butterflies script image onto white card using black pigment ink and turquoise sparkle embossing powder. Emboss the center butterfly panel only, twice onto the acetate using the dark blue pigment ink and the turquoise sparkle powder.
From the acetate butterfly panels cut out three complete creatures. Shape each insect by holding the body in a pair of tweezers, upside down, heat slightly with the heat gun, and whilst it is still warm, hold the wings down. When you now turn the butterfly the right way up the wings stay bent upwards. Set them aside for later.
Color the patterned border, the fringing, and the frame to the center panel with the blue pen. Use the blender with other colored pens to shade the butterflies. Decorate the script panel using both the blender and pale blue. Cut around the image. Layer the colored image to the bright blue, then the gold card and trim each time leaving a small border.
Mount the panel to the front of the folded blue card. Use a little double-sided tape on the body of the butterflies to attach them to the card front over the corresponding creature. To complete add a bow tied with co-ordinating ribbons.
Tag How to:
Trim white card to 6cm (2 1/2”) square. Layer this to gold and bright blue, each time trimming with a small border showing. Fold a piece of pale blue card 15cm x 7cm (6” x 3”) in half, stick your prepared white panel to the front. Punch a hole in the back of the card close to the fold and thread with sheer ribbon.
Emboss any of the butterflies onto acetate using the blue pigment ink and turquoise sparkle embossing powder. Trim the butterfly and bend the wings as before. Simply stick to the front of the gift tag with double-sided tape, add a few spots of glitter glue to enhance the wings and body.
Tips:
- Short of time? The flying creatures do not have to be overlaid onto stamped butterflies, they look as good on floral cards too.
- Although the wings look delicate they will flatten to slid into an envelope and pop back up again when the card is removed.
Designed by Wendy Stenton