
Halloween Wreath Craft Project
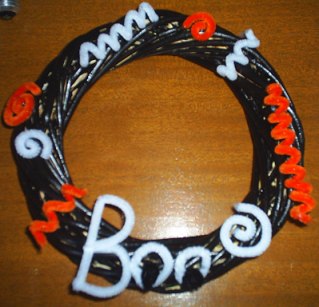 This cute wreath is easy to make and inexpensive. Kids will enjoy the fun shapes and it will add just the right amount of Halloween décor to your front porch.
What you will need:
1. Black spray paint 2. Plain willow wreath 3. Orange chenille stems 4. White chenille stems 5. Black chenille stems 6. Round pencil 7. Hot glue gun and glue sticks 8. Old newspaper
Directions:
1. Lay down some of the newspaper outside. 2. Put the wreath on the newspaper. 3. Use the spray paint to paint the wreath black. 4. Let the part you spray-painted dry. 5. Turn the wreath over and spray paint the back. 6. Allow the wreath to dry again. 7. Look over the wreath and spray paint any spots that have been missed. 8. Allow the wreath to dry. 9. While the wreath is drying get out the white chenille stems. 10. Wrap a white chenille stem around the pencil to make a corkscrew. Make at least two (you may need more depending on how big your wreath is). 11. Do the same thing with the orange chenille stems. 12. Take another white chenille stem and wrap it once around the pencil then shape a swirl out of it.
13. Do the same thing with the orange chenille stems. You will want at least two swirls in each color. 14. To make the boo at the bottom of the wreath, get another white chenille stem. 15. Shape it into a B by going up the stem about two inches then bending the stem to make a corner. 16. Make the top part of the B by wrapping the stem back to the straight part and then folding it over. 17. Now you can make the bottom part of the B by wrapping this around and back. 18. Make two ovals out of a white chenille stem. 19. Wrap a black chenille stem around the bottom of the oval to make it look like an eye. 20. Plug in the hot glue gun and put on a piece of newspaper. 21. Go check the wreath outside, and see if it is dry. 22. If the wreath is dry bring it in and place it on some newspaper. 23. Glue the Boo onto the wreath first with the hot glue gun. Be sure not to touch it again until the glue is cooled because it can easily fall off or be moved. 24. Glue the swirls and corkscrews onto the wreath with the hot glue gun. For the best look try to alternate colors and have the corkscrews face different directions. 25. Allow the hot glue to cool. 26. Hang your wreath on the door.
This wreath may seem as if it would be a hassle to store, but the chenille stems can be easily reshaped if messed up during storage. If any chenille stems are disfigured to the point that they cant be reshaped, then you can remove them from the wreath and make another.